 You are here: Home > All About Hand Dyeing > Instructions > How to Dye with Fiber Reactive Dye > How to Batik
advertisements
Books on Batik
Creative Batik
Batik: Fabled
Cloth of Java
Batik: Design, Style, & History
Chinese Indigo Batik Designs
Batik: 75 Selected Masterpieces
Batik for Artists and Quilters
How to Batik
 You can batik silk, cotton, and rayon with
the same easy fiber
reactive dye and soda ash recipe that is so popular in
other forms of hand dyeing. The advantage of this type of
dye is that with it, unlike all
purpose dye, you can use cool water (that won't melt
wax!), while
unlike naphthol dye, fiber reactive dye is reasonably non-toxic, and unlike vat
dye, the method is very simple and easy.
You can batik silk, cotton, and rayon with
the same easy fiber
reactive dye and soda ash recipe that is so popular in
other forms of hand dyeing. The advantage of this type of
dye is that with it, unlike all
purpose dye, you can use cool water (that won't melt
wax!), while
unlike naphthol dye, fiber reactive dye is reasonably non-toxic, and unlike vat
dye, the method is very simple and easy.
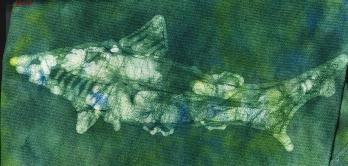
For pictures of successful batik - essential in helping you decide
what you want to create - see my Gallery and some of
the sites on my Links to Other Galleries page.
Getting Started
This is just as in the How to Tie Dye page: study the How
to Dye basic recipe first. Make
sure you have all the chemicals and supplies you need for dyeing: Procion MX dyes, urea,
sodium carbonate (soda ash), thin rubber or plastic gloves, measuring cups and spoons,
squirt bottles to put the dye solution into for application,
dust mask for measuring out dyes, and a bucket for pre-soaking the fabric
in sodium carbonate solution.
Be sure to pre-wash all clothing to remove invisible finishes that can prevent
the dye from getting to the fabric. (In place of the Procion
MX dye, you can substitute
any type of fiber
reactive dye that can use temperatures below the
softening point of wax, such as Cibacron F/Sabracron F or
Drimarene K dye; Dylon Cold Water Dye is an example of the latter, but avoid Dylon Multi Purpose dye, which is a hot water dye.)
Additional Supplies for Batik
You'll need to buy both beeswax and paraffin to mix together; some
cheap paintbrushes for covering large sections (don't waste good ones
on this);
a tjanting, or several, with which to apply the wax; and some way to keep the wax
at a constant temperature. I failed at batik until I acquired an electric skillet
for the sole purpose of melting the wax. I'd been using wax
that was melted, in a double boiler, but
not hot enough to penetrate the fabric. Batik instantly
changed from impossibly
difficult to easily manageable the day I bought an electric
skillet.
You can substitute synthetic "sticky wax" or
"microcrystalline wax" for beeswax, if you prefer. It is best to use a
mixture of beeswax (or its substitutes) and paraffin, because parafin
alone crackles too much, while beeswax alone doesn't crackle at
all. (If you don't like the crackle effect, use pure beeswax, or its
substitutes, without paraffin.)
Each of your tools needs a ridge on it to prevent it from
sliding down into the scalding hot melted wax. If they do
not already have a ridge of some sort, you can make
one by wrapping many layers of tape at just one place on the
handle of the tool.
Tjantings for drawing with melted wax are available from Dick Blick, PRO
Chemical & Dye, Dharma Trading, and other dye
suppliers. (See the Sources
for Dyeing Supplies page for contact information.)
Instructions
Draw with melted wax wherever you want the
fabric to remain a lighter
color.
If the wax does not seem to penetrate the fabric, it is probably not
hot enough; check the temperature. Use an electric skillet to maintain
the wax at the correct temperature. (Beware of dangerous overheating;
wax can burn, causing a dangerous house fire, or just smoke that can
cause lung damage.) It's best if your design can tolerate a few random light
spots from accidental drips of wax. Hold a rag in your other
hand, ready to catch unwanted drips before they fall.
I usually stretch the garment over a cookie sheet or other baking
implement, depending on the size of the garment; this prevents the
wax from getting through to the other side of the garment, and makes it
easier to control the fabric, as well. I have used a wooden
stretcher bar frame,
such as is used for mounting canvases for paintings, attaching a silk
garment by means of wire clips strung on rubber bands that wrapped around
the frame--it's certainly a lot more trouble that way, but the tension
is sometimes useful for painting woven silks. I like to use
a pencil to mark out my design on the cloth beforehand.
Apply dye when the wax is cool. (If you're
in a hurry, refrigerate.) You can wait for days
or even weeks after waxing to proceed to dyeing, if you
prefer. Crumple the fabric if you want a lot of veining,
then
pre-soak in sodium carbonate and apply dye as described in How to Dye. Use only cool water dye such as the Procion MX dye I recommend, not any sort of hot water dye, and be sure that your soda ash and your dye mixtures are at room temperature, not hot, since even a little melting may ruin your design.
Wash the excess dye out, after the full "batching" time of 2 to 24
hours has passed, using cold water only. You don't need melted wax in
your washer. Obviously, you must not let anything waxy get into your
hot air dryer.
Repeat? For traditonal, multiple-step batik, air-dry, and repeat the waxing
and dyeing
steps as desired, starting with the lightest colors and progressing
toward the darker ones, first spending some time to plot the
appropriate order for the colors and how each color will mix with the
previous ones. For modern "faux" batik, a single round, involving
direct application of different fiber reactive dye colors
where they are wanted, is
sufficient.
Removing the wax can be the hardest
part.
- Simmering in hot water, with soap, is the best method
I've found. This requires a large (preferably
several gallon) cookpot.
Add liquid soap, rather than detergent, to
the water. I've had excellent results with Dr. Bronner's
brand liquid castile soap, which is commonly available in
whole foods stores. Using this soap, I did not have to get
the water anywhere near a boil before all of the wax had
floated to the top of the pot. The procedure is much more difficult
without soap, though you can re-use the wax if you don't use
soap or detergent to aid in its removal.
If you allow the pot to cool afterwards, with the fabric
safely below the surface, the wax will harden so that you
can lift it off, instead of leaving a residue in the fabric.
Don't worry about toxicity from the wax
in your food pots, as both beeswax and paraffin are
considered safe for consumption, though indigestible in
quantity; there is the practical matter of removing any wax
that gets on the sides of the pot, after scraping as much as
is easy to get out, but heating the pot and wiping with
paper towels works.
Alternatives to boiling:
- Ironing the wax out between sheets
of newspaper (using unprinted paper next to the cloth to prevent ink
transfer) is a lot of trouble, often leaves some wax in the
fabric, and, some warn, can create lung-damaging
paraffin fumes.
- Dry cleaning won't work at all, unless your dry cleaner
still uses the older solvents that do dissolve wax (ask if they can
remove wax, first). Some batikers have found dry cleaners
that do remove wax, but I've never been able to find one in
my area.
- Steam cleaning by a dry cleaner is
expensive (often $5 a piece).
- Dharma Trading also suggests
using *hot* water from a hose to rinse the wax out, but that
requires that you increase the setting on your water heater
enough to risk scalding in the house.
- White gasoline (used for camping stoves) and other organic solvents can be used to remove wax, but the process is cumbersome, and the solvents can cause brain damage if you breathe them for too long. Never use organic solvents indoors.
Batiking without wax
You may occasionally read of batiking with alternative resists. Beware
of water-soluble resists; I found the hard way that Deka's Silk Resist, for
example, washes right out during the sodium carbonate pre-soak step of
dyeing. If you use a washable resist, not only will you lack the
interesting cracks and veins, but you will also need to find an
alternative to the use of the washing soda pre-soak, such as applying
sodium carbonate solution or Dharma's After-Fix afterwards,
or drying the fabric after pre-soaking in soda ash, before
applying the resist. This also requires a much more frugal hand with the dye
solutions than I am accustomed to applying, as large excesses of dye
solution will also wash away any water-soluble resist. Alternative
resists can be
extremely valuable, resulting in wonderful results - but these results
will never be very close approximations of true wax batik.
Soy wax for batik
Soy wax is processed hydrogenated vegetable oil which is hard at room temperature. It can be used for immersion dyed batiks, with the advantage that it will wash out in hotwater in your washing machine. Some batik artists have gotten excellent results withthis resist. However, others have been disappointed by its not blocking the dye as completely, or by its wearing away in the dye bath. It is worth experimenting with. Use the hardest type of soy wax, from a dye supplier or labeled as being suitable for making pillar-type candles; do not use the softer type intended for use in containers.
Elmer's Washable Blue Glue Gel
You can also use Elmer's washable blue gel glue as a resist. It will last through a brief immersion period. To wash it out, first soak it in cold water. There will be none of the cracks associated with traditional wax batik, but the safety of using cold glue gel instead of hot wax makes it preferable for projects that children will work on.
Next: Low water immersion dyeing....

 Home Page
Hand Dyeing Top
Gallery
About Dyes
How to Dye
How to Tie Dye
How to Batik
Low Water Immersion Dyeing
Sources for Supplies
Book Reviews
Other Galleries
Groups
FAQs
Custom Dyers
Forum
Q&A blog
link here
search
contact me
Home Page
Hand Dyeing Top
Gallery
About Dyes
How to Dye
How to Tie Dye
How to Batik
Low Water Immersion Dyeing
Sources for Supplies
Book Reviews
Other Galleries
Groups
FAQs
Custom Dyers
Forum
Q&A blog
link here
search
contact me
All of the pages on this site are copyright ©1998‑2026 Paula E. Burch, Ph.D.
Page created: July 17, 1999
Last updated: August 24, 2009
Downloaded: Friday, July 24, 2026
 You can batik silk, cotton, and rayon with
the same easy fiber
reactive dye and soda ash recipe that is so popular in
other forms of hand dyeing. The advantage of this type of
dye is that with it, unlike all
purpose dye, you can use cool water (that won't melt
wax!), while
unlike naphthol dye, fiber reactive dye is reasonably non-toxic, and unlike vat
dye, the method is very simple and easy.
You can batik silk, cotton, and rayon with
the same easy fiber
reactive dye and soda ash recipe that is so popular in
other forms of hand dyeing. The advantage of this type of
dye is that with it, unlike all
purpose dye, you can use cool water (that won't melt
wax!), while
unlike naphthol dye, fiber reactive dye is reasonably non-toxic, and unlike vat
dye, the method is very simple and easy.