 Low Water Immersion dyeing is also known as "scrunch" dyeing,
"crumple" dyeing, or "crackle" dyeing. In traditional
immersion dyeing, one uses a large
volume of water, frequent stirring, and the use of leveling agents
such as salt and, optionally, Calsolene oil, in order to make the
color as smooth and featureless as possible. Low water immersion
dyeing is the opposite of this approach. In low water immersion
dyeing, one uses as little water as possible, crunching the fabric
together for a sort of resist effect, with as little stirring as
possible.
Low Water Immersion dyeing is also known as "scrunch" dyeing,
"crumple" dyeing, or "crackle" dyeing. In traditional
immersion dyeing, one uses a large
volume of water, frequent stirring, and the use of leveling agents
such as salt and, optionally, Calsolene oil, in order to make the
color as smooth and featureless as possible. Low water immersion
dyeing is the opposite of this approach. In low water immersion
dyeing, one uses as little water as possible, crunching the fabric
together for a sort of resist effect, with as little stirring as
possible.
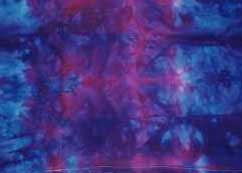
Wonderful color gradations are the hallmark of the low water technique. Where mixing opposite colors, such as red and green, result in ugly muddy effects in tie-dye, they result in gorgeous subtle shadings in low water immersion dyeing. The reason for this is that, in tie dyeing, one normally pre-soaks the fabric in the soda ash fixer, or else adds it to the dye solutions themselves, so that the dye immediately reacts with the first fiber it touches. There is no chance for the dye colors to blend before the reaction takes place. In contrast, the low water technique involves adding the fixer *last*, after allowing the colors to slowly blend and creep along the fabric, resulting in truly infinite gradations of color.
For pictures of examples, see the low water immersion section in my gallery.
As in other forms of hand Procion MX dyeing, study the How to Dye basic recipe first. Make sure you have all the chemicals and supplies you need for dyeing: Procion MX dyes or other fiber reactive dyes, sodium carbonate, thin rubber or plastic gloves, measuring cups and spoons, dust mask for measuring out dyes, and a small bucket, large jar, or other container for doing the dyeing in. (The container should be plastic, glass, enamel, or stainless steel, not aluminum or iron.) The container should be no wider than necessary to hold the fabric, as it is best to really cram the fabric in tightly, for maximum contrasts. Be sure to pre-wash all clothing to remove invisible finishes that can prevent the dye from getting to the fabric.
Applying dye. First, crumple the garment or cloth and stuff it tightly into a container. Then mix up one color of Procion MX or similar fiber reactive dye, anywhere from 1/16 to 4 teaspoons of dye per cup, total volume one to two cups (where a teaspoon is about 5 ml, and a cup is about 250 ml). Do not add urea - you want nothing but pure dye in water. It may take five or ten minutes of constant stirring to dissolve some dyess. Pour this over the garment.
Next, mix another color, in much the same manner. Try wild color combinations - I've had great success with purple plus orange, or black plus emerald green. I like to be careful to wet the entire top layer of the garment, in case air bubbles within the garment cause it to float, leaving the top regions sticking out of the dye bath. (Better, perhaps, to avoid air bubbles altogether.)
You may choose to pour a cup or two of plain water over in between adding different colors, or you may choose to put one color in the bottom of the container (having first checked the fit with the dry garment in the clean container) before adding the clothing, and pour another color over the top.
You can also use only a single color, especially if it is a mixture of dry dye colors so that the colors will tend to separate out as they creep along the fabric. Keep track of how much water you add, total, for the next step. Do not stir or mush the fabric at all in this step, unless you wish to mute the variations in the final piece.
Allowing the colors to blend and spread. After you have added enough dye and water to almost cover the garment (try weighting it down with a glass measuring cup, if it floats too much - beware of rust spots from metal objects used as weights), leave it alone for anywhere from a few minutes to an hour. This time allows the colors to creep along the fabric, creating beautiful mixtures. Pre-mixed colors will tend to separate as the constituent dyes creep along the fabric at their own individual rates. Too little time will not allow this diffusion separation to occur; too much time can actually reduce the amount of variation in the piece, however, by allowing the dyes to diffuse toothoroughly, and blend together. (How much is too much, under your chosen conditions? Only trial and error can say for sure.)
Fixing the dye. When you have left the dye to rest long
enough, you can now add the fixer. This is the same sodium carbonate,
or soda ash, used in the other recipes in this site. A good
concentration to use is one teaspoon (5 ml) for each cup (250 ml),
total volume, in the dye bath - including whatever amount of water you
will be using to dissolve the soda ash in for adding it. Soda ash
dissolves best in warm water, about 95°F (35°C). If you have used a total of 8 cups of
water in your dye bath, then, use 9 teaspoons, or 3 tablespoons, of
soda ash, dissolved in an additional cup of water. Gently pour this soda ash solution over
the top of the dye bath. I add more water if the topmost bits of
fabric are still sticking out of the liquid, at that point. I do not
stir or agitate the mixture in any way.
All of the pages on this site are copyright ©1998‑2026 Paula E. Burch, Ph.D.
Page created: July 25, 1999
Last updated: October 16, 2006
Downloaded: Friday, July 24, 2026
